
Single Tensioner Cable Railing Systems
June 9, 2025

If you’re building a deck and researching cable railings; you may be wondering what type of railing posts would be best for your installation. With so many products available online, it can be difficult to decide. We hope to make it easier with some information and recommendations about material selection and cable railing post types for all kinds of projects. Using Wooden Posts to Construct Cable Railings One of the most widely used and commonly known post type is a wooden 4″x4″. This is an inexpensive and widely available post option for most people. Wood posts are very easy to install. One drawback to using wood posts is sustaining cable tension. Softwoods like cedar and redwood can be the most difficult of all the cable railing post types. Wood swells and shrinks in different weather, making it difficult to maintain tension. We recommend the use of hardwoods like Ipe’ and Cumaru if wooden posts are your preferred choice. Hardwoods are stronger and behave more like a steel railing frame. Steel and Stainless Steel Railing Posts Coastal and harsh weather environments call for extremely durable railing materials. From a pure longevity standpoint, steel and stainless steel posts are some of our top choices. When salt is present, high grade stainless steel is a must. For non salt applications, galvanized steel will offer a 30 year lifespan. The addition of exterior coatings like epoxy paints can extend the durability to 50 years. Steel and stainless steel railing posts can satisfy many design styles. These materials also afford the ability for the most minimal railing profiles. Spreader Posts and Specialty Railing Post Types The use of “intermediate” or “spreader” posts is a popular method for reducing cable spread and also minimizing visible obstruction. These posts are low profile and usually made from flat bar or low profile tube steel. It’s important to remember that spreader posts are not structural. They should not be used as end or corner posts because of their light duty nature. Aluminum Cable Railing Posts Because aluminum is a lightweight material, it can require slightly larger posts or the use of top and bottom rails. Aluminum railing systems like Feeney Design rail, may utilize a combination of end posts and spreader posts to reduce cable spread. Aluminum is very durable, therefore making it a good choice for coastal railings and longevity. San Diego Cable Railings offers all of the cable railing post types discussed in this article. Our company has a line of engineered cable railing posts as well as specialty posts like flat bar spreaders. If you are interested in our products, please give us a call at 844-277-7327 or visit the quote request page.
Many of the same considerations made when constructing deck railings will also apply to railing systems for retaining walls. Outdoor railings are subjected to a host of environmental and usage factors that do not apply indoors; so durability of the railing materials is very important. Additionally, the mounting style and connection types may vary greatly from an exterior wall to an interior railing system. Based on our experience and a variety of our own retaining wall projects, here are some of the most common considerations we encounter on wall mounted railing systems: Approved Fasteners and Connections for Retaining Wall Railings There are several wall construction methods we see quite frequently with our wall mounted cable railings. Standard CMU walls, geo grid walls, and poured concrete walls are a few of the most common wall types in California. Connections of railing posts to poured concrete and CMU (block) can be made directly with the use of approved concrete anchors or epoxied rods, where a stackable block wall may require something different. It’s important to know if the wall is engineered for a direct railing mount or if it must be cast in place. Additionally, the installer should consider where the reinforcement bars have been placed, and if there is enough room for embedment. Certain applications have required posts to be cast in concrete ground footings behind the actual wall vs. on top. Hollow Block Walls and Masonry Fencing On occasion we have been called out to install retrofit railings and fencing on existing block walls or masonry fences. The main difference between a masonry wall and a fence is that a masonry fence is not designed to retain earth, and therefore may be hollow or only contain sporadically filled cells. A hollow wall doesn’t necessarily eliminate the possibility of a wall mounted connection, however railing posts should not be connected to hollow CMU block cells. A concrete block by itself is not designed do take a lateral or shear load from any railing member. Retrofit grouting of cells at the post locations may be necessary in order to make a proper connection. Many times this can be achieved by drilling holes in the existing caps and pumping high strength grout into the cells. Once the grout has cured, the railings can be safely mounted. What are the Best Railing Systems for Retaining Walls? Like any “what is the best?” question; preferences will play a role in the ultimate selection of the railing type; however we do believe that steel is preferential to wood when it comes to wall mounted railings. A steel framed cable railing system with a direct mechanical or poured connection will be far superior to a wooden fence or picket rail for example. Wooden posts will require larger members in comparison to steel; and possibly stand alone brackets in order to mount on top of the wall. A steel post with a welded connection can be directly attached with wedge anchors; epoxy rods or cast directly into CMU cells with relative ease. The durability and longevity of a stainless steel cable railing system will also far surpass the wooden wall top fencing and railings. Aesthetically, modern design trends would also lean towards the clean look of cable or possibly a wall top glass railing system. Cable Railing Products for Wall Mounted Railings San Diego Cable Railings furnishes cable railings and glass railing systems for several of the most common retaining wall applications. Our online storefront features many stock products that can be mounted directly to new and existing walls. Many of our products are engineered, and our preferred installers have over 15 years experience installing these type of railings all over California. If you have questions about a wall mounted railing or would like an estimate please give us a call at 844-277-7327 or visit the quote request page.
Coast to Coast Shipping and California Cable Railing Installation A welded bare stainless steel frame with 1/8″ stainless steel cable infill resulted in a stunning finished product at one of our recent installations in Paso Robles, CA. The remote location with mountain and lake views called for something elegant and transparent to blend into the existing landscape; all the while complimenting the vanishing edge pool, BBQ and fire pit. This was a challenging build due to the unique configurations, curves and of course the remote setting for the project. Most of the railing system was pre-fabricated at our production facility in San Diego, CA. with bending and minor modifications done on site by the guys at SD Independent Construction. Welded post mounts and concrete anchors were used for the post attachment; creating a solid barrier with the rigidity of a block wall. For top railings 1″x3″ stainless steel was chosen to maximize visibility and a clean modern aesthetic. Using Type 316 Stainless Steel for Transparency and Durability The beauty of bare stainless steel is that it reflects its surroundings. Whether it be trees or water; regardless of the season, bare stainless steel blends naturally. While achieving a high end look, stainless will generate less heat than a dark colored railing. Daytime users can appreciate this on hot summer days. Additionally, using T316 stainless is a good idea on poolside decks with so many traditional pool builds now converting to saline (salt water) . San Diego Cable Railings offers Nationwide shipping and installation services for cable railings across the California coast. Our production team and preferred installers have produced high quality fences and railings for customers in San Diego, Orange County, LA, Santa Barbara, San Luis Obispo and San Fransisco. In addition to our in house cable railing products we also offer glass railing systems and products by Feeney. If you would like to learn more about our cable railing products or get an estimate for cable railings, visit the quote request or give us a call at 844-277-7327 today.
If your outdoor living space is looking a bit drab, it may be time for a facelift. A structurally sound deck may only require some regular maintenance or material upgrades for a new and updated look. Today’s modern materials and building techniques can remove years from your decks appearance without the cost of a complete overhaul. Here are 3 easy ways to modernize your deck without breaking the bank: Exploring Finish Options and Construction Techniques for a Modern Deck Remodel #1-Deck Refinishing- In many cases an older deck just needs a facelift. Wooden decks tend to lose their luster over time becoming weathered and thus looking older. The least expensive and probably quickest update is to clean and refinish your deck. In addition to a clean space looking better; it will actually extend the life of your investment. Leaving environmental contaminants on flat surfaces greatly expedites the amount of wear. UV rays bake on dirt, so try to keep your deck clean with periodic maintenance or hire a pro. A professional refinisher may charge a flat rate for a smaller deck or in the neighborhood of $2.00-$4.00 per square foot for a wooden deck refinish. #2 Replacing the Decking- If the structural bones of the deck are good then replacing just the deck boards may be an option to achieve a more updated finish. Exotic hardwood species like Ipe‘ and Cumaru are very popular and durable alternatives to older wooden decks. Composite decking also offers a more modern twist on deck boards by offering a ton of color options, faux hardwoods and hidden fastening systems. Both hardwoods and composites can last upwards of 30 years so the cost of these materials is justified by the quality. Hardwood and Composite boards can run anywhere from $2.50 – $6.00 per lineal foot of 6″ material which we need to multiply by 2 in order to get an estimated square foot cost of $5-$12 per square. In addition we need to factor the cost of screws or a hidden fastener system which can add about $1.00-$2.00 dollars per square foot. #3 Installing New Deck Railings- Adding a cable railing system or glass railing to an older deck will remove decades from its appearance. If the deck has street exposure it will likely take decades off of the appearance of the house as well. Cable railings are modern and sleek; in line with the most utilized style of many newer buildings and developments. Glass railings provide transparency and windbreak with the look of modern finishes like brushed stainless or aluminum. Both railing options provide the ability to add extras like LED lighting for a finishing touch. One smart pro tip for any deck railing replacement project is to try and perform any refinishing, or deck board replacement prior to installing the new railings. By following this order you can avoid any possible damage to the new railings and also make each individual facet more streamlined. A typical order of operations for a more extensive deck remodel would call for any removal and repairs first, followed by a new deck surface and new railings. San Diego Cable Railings provides sales and installation services for cable railings and glass railings up and down the coast of California. We also offer our cable railing products to DIY customers across the country. If you have questions about ways to modernize your deck our pros can help. Give us a call at 844-277-7327 or visit the quote request page today.
How to Properly Clean and Maintain Your Cable Railings It is absolutely OK and also a recommended practice to perform periodic maintenance and cleaning of your cable railings. The use of a power washer can make the job easier in some cases; and also keep contamination away. The use of specifically designed cleaning products can also keep your cable railings looking brand new for years to come. Power washing stainless steel cable railings is only one of the ways to keep your deck in tip top shape! Here are a few other tips and tricks to make cleaning your cable railings easy and effective: Power Washing- Also called “pressure washers” ; power washers are great tools and small units are pretty affordable. There are a few low priced vacuum sized models available at big box stores that have plenty of power to do household cleaning jobs. Power washing requires discretion because of the high pressure involved. Forcing water in to perforations or using too much pressure can damage your railings (especially wood) so use care when operating. We recommend using a wide stream nozzle from a safe distance 1′-2′ and start by cleaning the stainless cables only. Dirt and grime from arial contaminants is easily removed; as is organic build up from nearby plants and shrubs. Once you get the hang of using the machine; the pressure can be dialed up or down and your distance from the object can also be adjusted. Posts and railings as well as decking can also be cleaned with your power washer. The main idea is to clean without creating any surface damage. Cleaners- The use of specifically designed stainless steel cleaners can also aid in the cleaning and maintenance of your cable railings. A good stainless cleaner should leave a light film of oil that further prevents contaminant build up and makes future cleanings easier. In a pinch, good old WD- 40 works pretty well when it comes to cleaning stainless steel. The main thing to remember is that contaminants and caustic products can damage stainless steel so ALWAYS use products that are recommended for stainless cleaning. We use and furnish “Steel Renewal” products by Feeney. Ask one of our sales associates if you are interested in these products. Non Recommended Stainless Cleaning Practices- It is never a good idea to use steel wool on stainless steel cables. Steel wool can leave behind traces of metal that will contaminate your cables. Caustic products, acids, and anything that contains etching materials or other metals is not recommended. Stainless steel is super durable and easy to maintain with simple soap and water if you do not have the right cleaner. If you don’t have a power washer then a simple non metallic scotch brite pad will work wonders. The main thing to remember is to do your periodic maintenance and avoid build up; this will make your cleaning project fast and easy. San Diego Cable Railings offers cable railing maintenance packages to local customers looking to keep their railings in brand new condition for the long haul. Talk to one of our cable railing pros at 844-277-7327 or visit the quote request page to find out more about power washing stainless steel cable railings and cable railing maintenance.
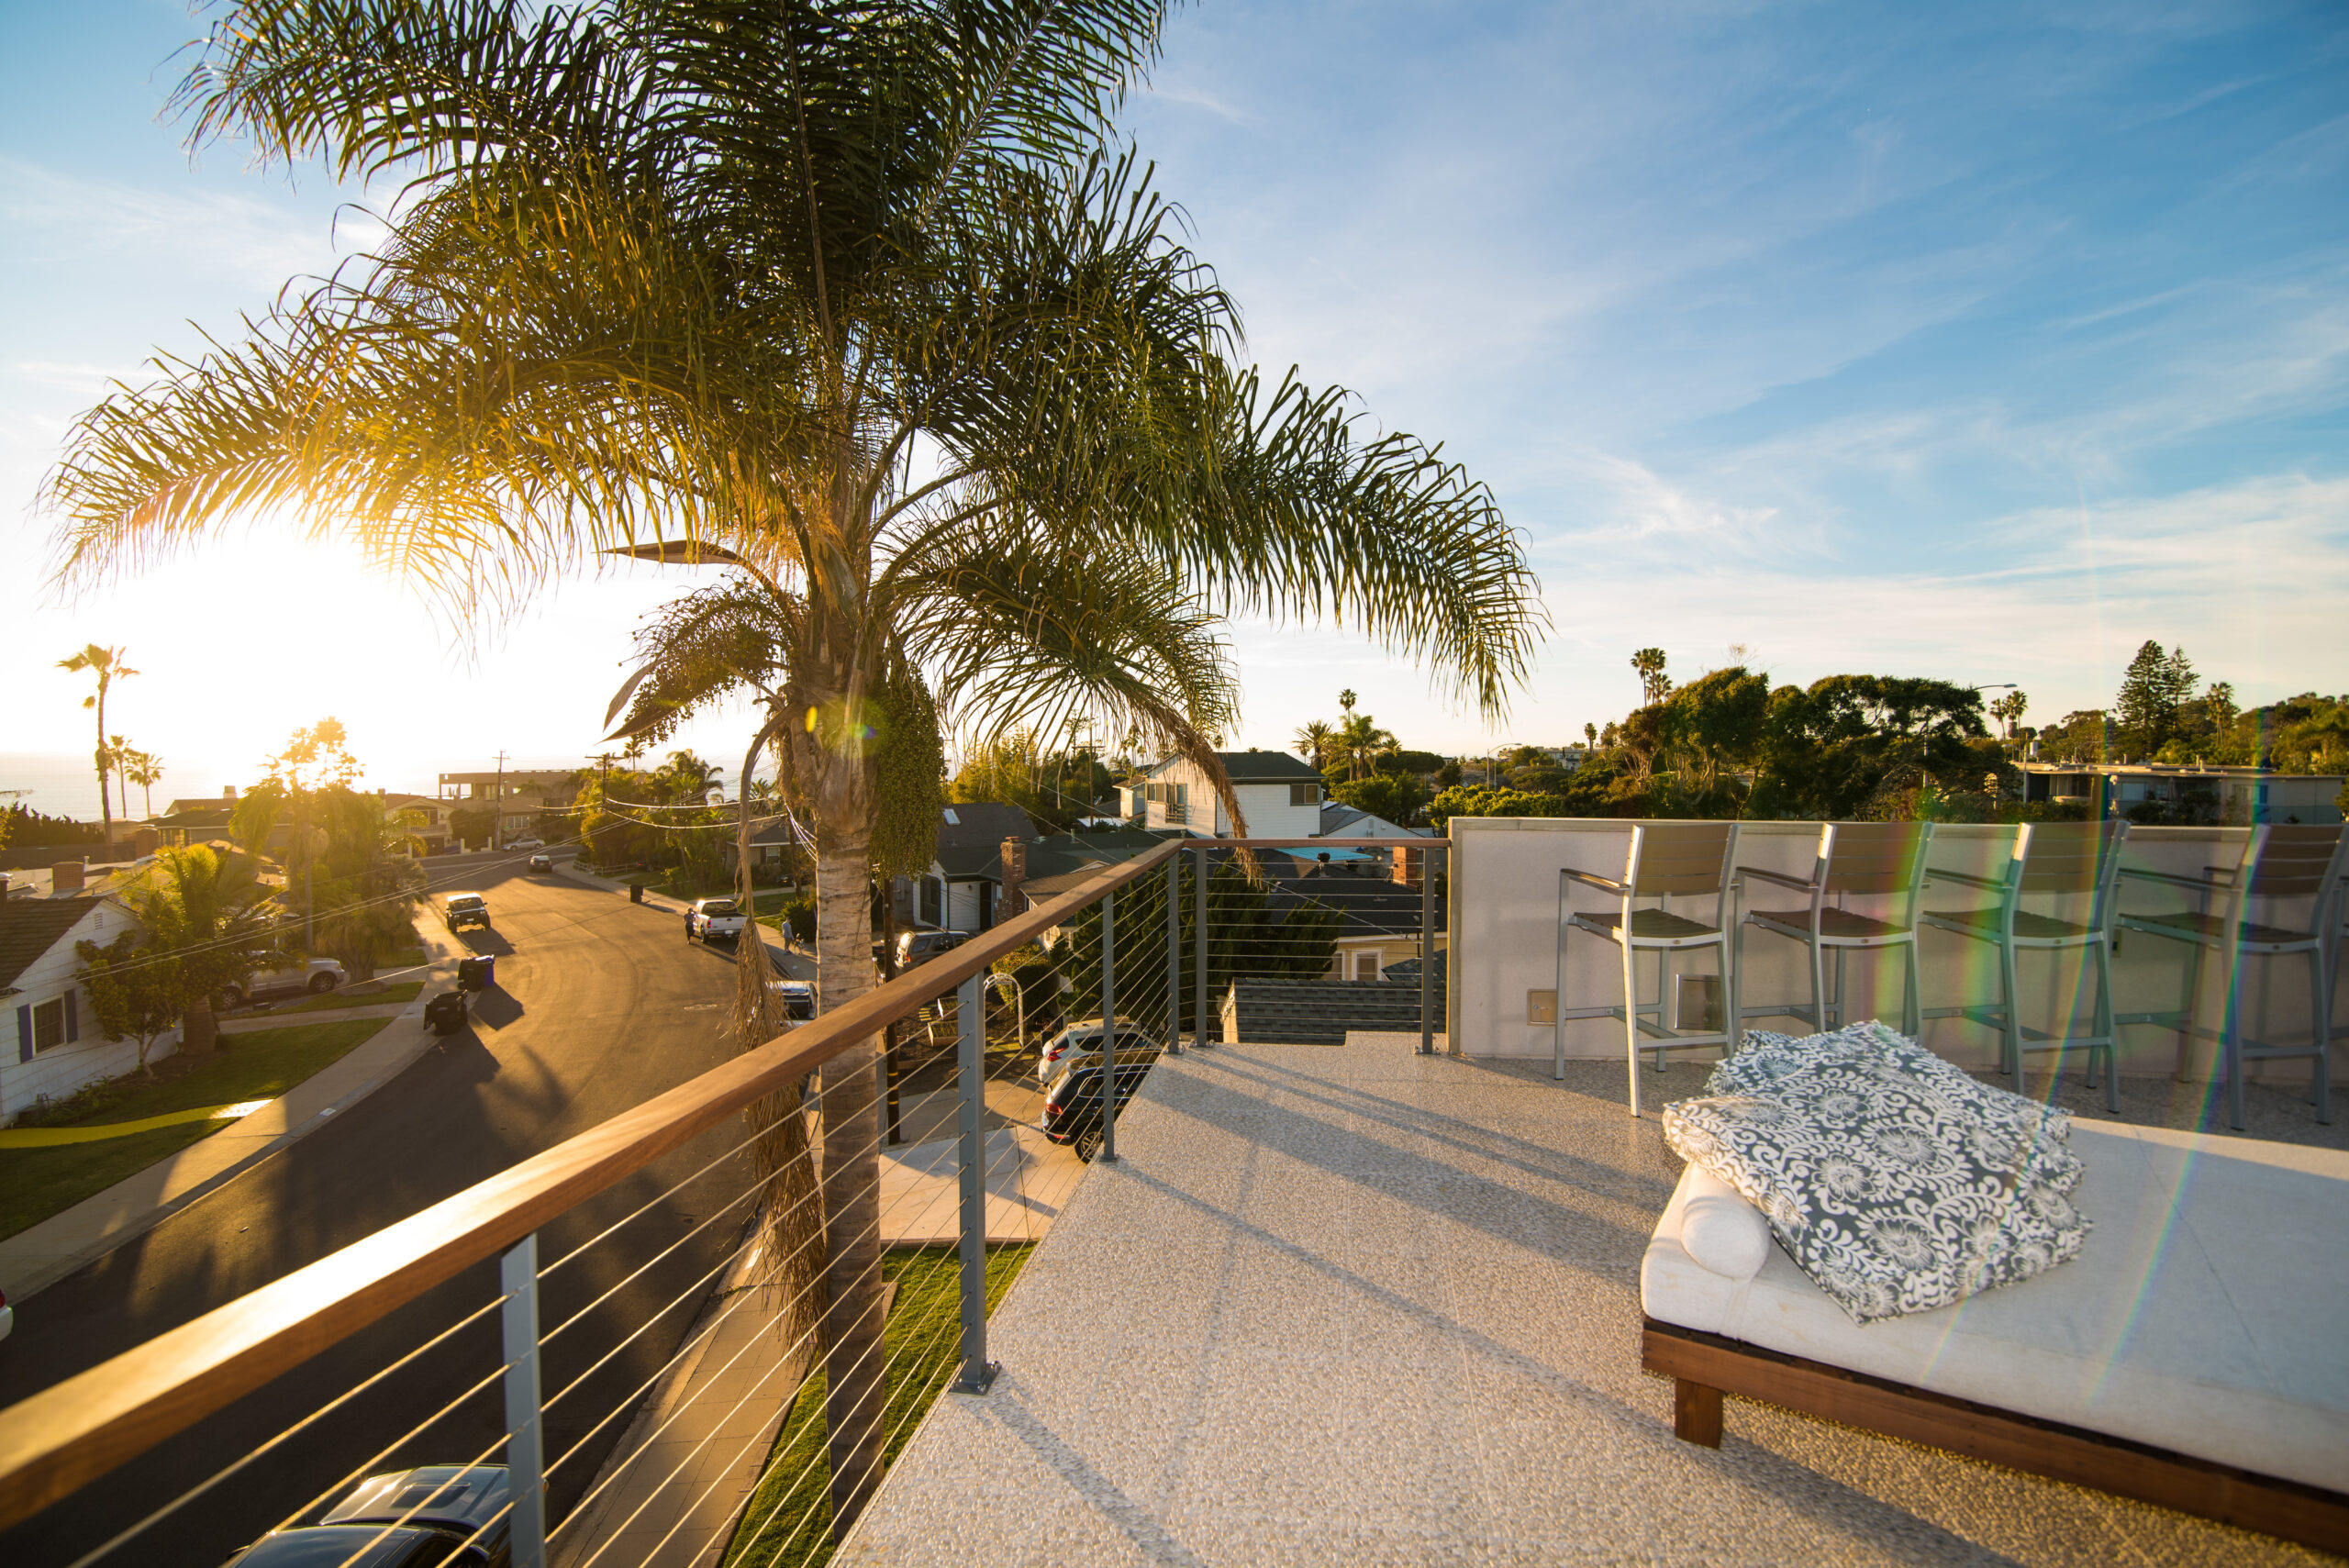
Things to Consider When Constructing Rooftop Deck Railings Rooftop decks add panoramic views and outdoor living possibilities on the California coast. As decking and railing options have become more sophisticated, these types of decks have gained popularity. Ocean views may even exist where they might not otherwise be possible. Railing installations on roof decks pose a different set of considerations than on grade or ground level decks. Whether you choose a cable railing, glass panel or other railing type; sloped deck railings will require some custom considerations. So what are the most important things to consider when it comes to constructing rooftop deck railings? How should you mount your railings to a rooftop? Here are the most commonly encountered areas to examine when it comes to rooftop deck railings: Pitch- Almost all roof decks are sloped. The ability to shed water is probably the most important factor on any dry deck space. The amount of slope the deck requires will depend on the waterproof membrane, size of the deck, and whether or not drains or drip edge are shedding the water. Standard ground level decks are typically built level, which can be an easier railing installation. Rooftop deck railings require pitch adjustments and angles. They can be made to follow the pitch of the roof (angled) and maintain the proper railing height; or they can be modified to maintain a level top rail in order to do this. Choosing to construct a level top rail on a sloped deck will require the rail to grow in the amount equal to the overall slope of the deck. For example : 2″of slope in 10′ of railing would require the rail to grow from 42″ to 44″ at the sloped edge in order to maintain a level rail. Aesthetically the level rail option is almost always preferred over a sloped railing. Waterproofing- On new construction projects the waterproofing should be completed and cured prior to the railing installation in most cases. Unless the post bases are to be coated over during waterproofing; it is preferable to install them on a finished surface. Choosing a fascia mounted railing system will prevent the need for perforations in the waterproof deck surface, however this is not always possible to fascia mount your railings. Some homes have rain gutters or undersized fascia that will not allow for fascia mounting. In these cases where surface mounting is the only option; it is important to waterproof any perforations and around the base plates of the railing posts. Additionally, the waterproofing should be inspected annually. Jiffy seal can also be used underneath post bases for extra protection in and around any perforations. Structural Blocking- Structural blocking is needed at all post locations on any deck in which 3″ of structural backing thickness does not already exist (Large beams are often a substitute for blocking). Bolting into plywood sheeting only is not acceptable for the lateral loading required for railing posts. If you are building a new deck or repairing an old deck, it’s important to add blocking at the post locations PRIOR to the new sheeting and waterproofing. If you are doing a DIY install and unsure of where to install this blocking; consult the manufacturer. If you have a professional installer he can install the blocking prior to the waterproofing contractor. As most rooftop deck framing is NOT exposed from the underneath, blocking the deck after the waterproofing is involved and expensive. If you have questions about rooftop decks or would like an estimate for a deck railing give our pros a call at 844-277-7327 or visit the quote request page.
Pro Tips for Sizing and Installing Grab Rails at Your Home With some accurate measurements and a couple of tricks, installing a grab railing is a great DIY project and a valuable home improvement. A “grab rail” is a continuous section of handrail used to provide support when ascending and descending a set of stairs. Installing a grab rail can be an attractive and functional addition to your stairs. It will provide a graspable support and a nice design element at a low cost. If you’re looking to install a new grab rail or replace an old one; here are a couple of tips to get you started: Locate your studs– Using a stud finder, magnet or pilot pin, locate the studs on the wall where you plan to install your railing. Purchasing grab rails online could require you to specify the number of brackets needed to support the rail. Installing them directly into wall studs will provide the best connection. A bracket every 32″-48″ should be enough to secure a steel or hardwood grab rail if the brackets are secured to studs. Measure the wall section exactly! –If you plan to purchase a steel or stainless steel grab rail, the return ends will be welded on during fabrication. This means your measurements need to be dead on. Pro tip – measure up from the nose of the top and bottom stair using a plumb line or level and mark the location above each stair (somewhere between 34″-38″ is code required height). Then snap a line on the two marks so you can measure on the exact angle of the grab rail. Use drywall anchors if needed– If you are unable to locate enough studs or the layout does not accommodate your railing section, you can use drywall anchors for extra support. Just mark the hole locations and install the anchors behind the bracket locations. It is not recommended to screw brackets into drywall without a proper anchor. Drywall is not designed to be a structural support. New construction projects with stairs or any permitted stairway remodeling projects will almost always require the installation of a grab rail. Some stairways require installation on both sides of the stairs while others only require a graspable rail on one side only. Sometimes during the home purchase process insurance companies or home inspections will require the installation of graspable railings. San Diego Cable Railings furnishes hardwood, steel and stainless steel grab rails for professional and DIY installations nationwide. We offer standard length sections (8′, 10′, 12′) and custom fabrication for non standard installations. For customers requiring professional installation we also have licensed contractors who specialize in code compliant railing installs. If you have questions about any of our grab rail products or would like a quote for graspable railings; visit the quote request page today! [ec_store modelnumber=”Ipe-Grab-Rail”]
Interpretation of Glass Railing Codes Glass railings allow us to preserve our views while also providing a safe and attractive wind break on exterior decks. Interior uses for glass panels are also numerous when we consider modern stairways, lofts and breezeways often encountered in high end homes. According to some sources glass creation has been around for 4000 years or more and used in architecture for hundreds of years. We know it works well, but todays codes can be hard to understand when it comes to glass panel railings. Included below are some of the more commonly encountered topics about glass railing codes pertaining to railing projects: One of the most popular questions we receive about glass railing codes is “Do I need a top rail on my glass railing?” The answer is Yes and possibly No… According to the ICC (International Code Council) – Guards with structural glass baluster panels shall be installed with an attached top rail or handrail. The top rail or handrail shall be supported by a minimum of three glass baluster panels. Or shall be otherwise supported to remain in place should one glass baluster panel fail. Exception: An attached top rail or handrail is not required where the glass baluster panels are laminated glass with two or more glass plies of equal thickness and of the same glass type. To break this down further : Two sheets of 1/4″ glass that are laminated together are considered to be one @ 1/2″ laminated glass panel. In theory the laminated panel would further prevent breaking and also prevent falling glass from leaving the railing infill. If you use this type of glass you MAY be exempt from using a top rail. ALWAYS check with your local building department. Free Standing Glass Panels and Glass Clip Railing Systems The previously referenced top rail and laminated glass railing codes most commonly pertain to free standing or clipped glass panels. These type of railing systems do not secure the glass with a top rail, thus requiring more stringent requirements that are harder to interpret. The safest way to guarantee that the requirements are met is by discussing the requirements with the local building authority. When it comes to building inspections the field inspector will ultimately have the final say and has likely encountered many glass railing projects. Height and loading requirements for glass railings are very similar to cable railings and other balustrade railing types. In California, a 42″ net height is required for glass barrier railings. Stairs will require handrails between 34″ and 38″ high regardless of design. The lateral loading requirement of a minimum 200 lbs applied to the top rail at any location also applies to glass railings. Minimum Panel Thickness for Glass Railings The minimum panel thickness associated with most railing systems is 1/4″ thick tempered glass. Does railing glass have to be tempered?- Yes. Almost all architectural applications call for tempered glass. As far as the minimum thickness call out of 1/4″ glass; thicker glass is becoming more and more common these days. Frameless systems may require thicker glass and/or lamination as stated earlier in this post. 1/4″ glass is commonly seen in full framed glass railings like the photo above. Most tempered glass panels have a stamp, and this visible symbol is often required in order to pass inspection. “Glazing” is the process of using glass (or other panelized materials) as an infill for windows, doors, railing panels etc. For the most part our modern railing codes deal with human impact, structural and/or wind loads associated with glass panels. Much of the published material on code requirements deals with glass thickness and also requirements involved with tempered glass. San Diego Cable Railings furnishes complete glass railing systems. We offer wooden, steel and aluminum framing options for interior and exterior glass applications. Additionally, we are an authorized distributor of Feeney design rail systems. For customers who require a turnkey sales and installation; we have a network of preferred installers specializing in glass railing installation. If you have questions about glass railing codes or would like an estimate for a glass railing system; please visit the quote request page.
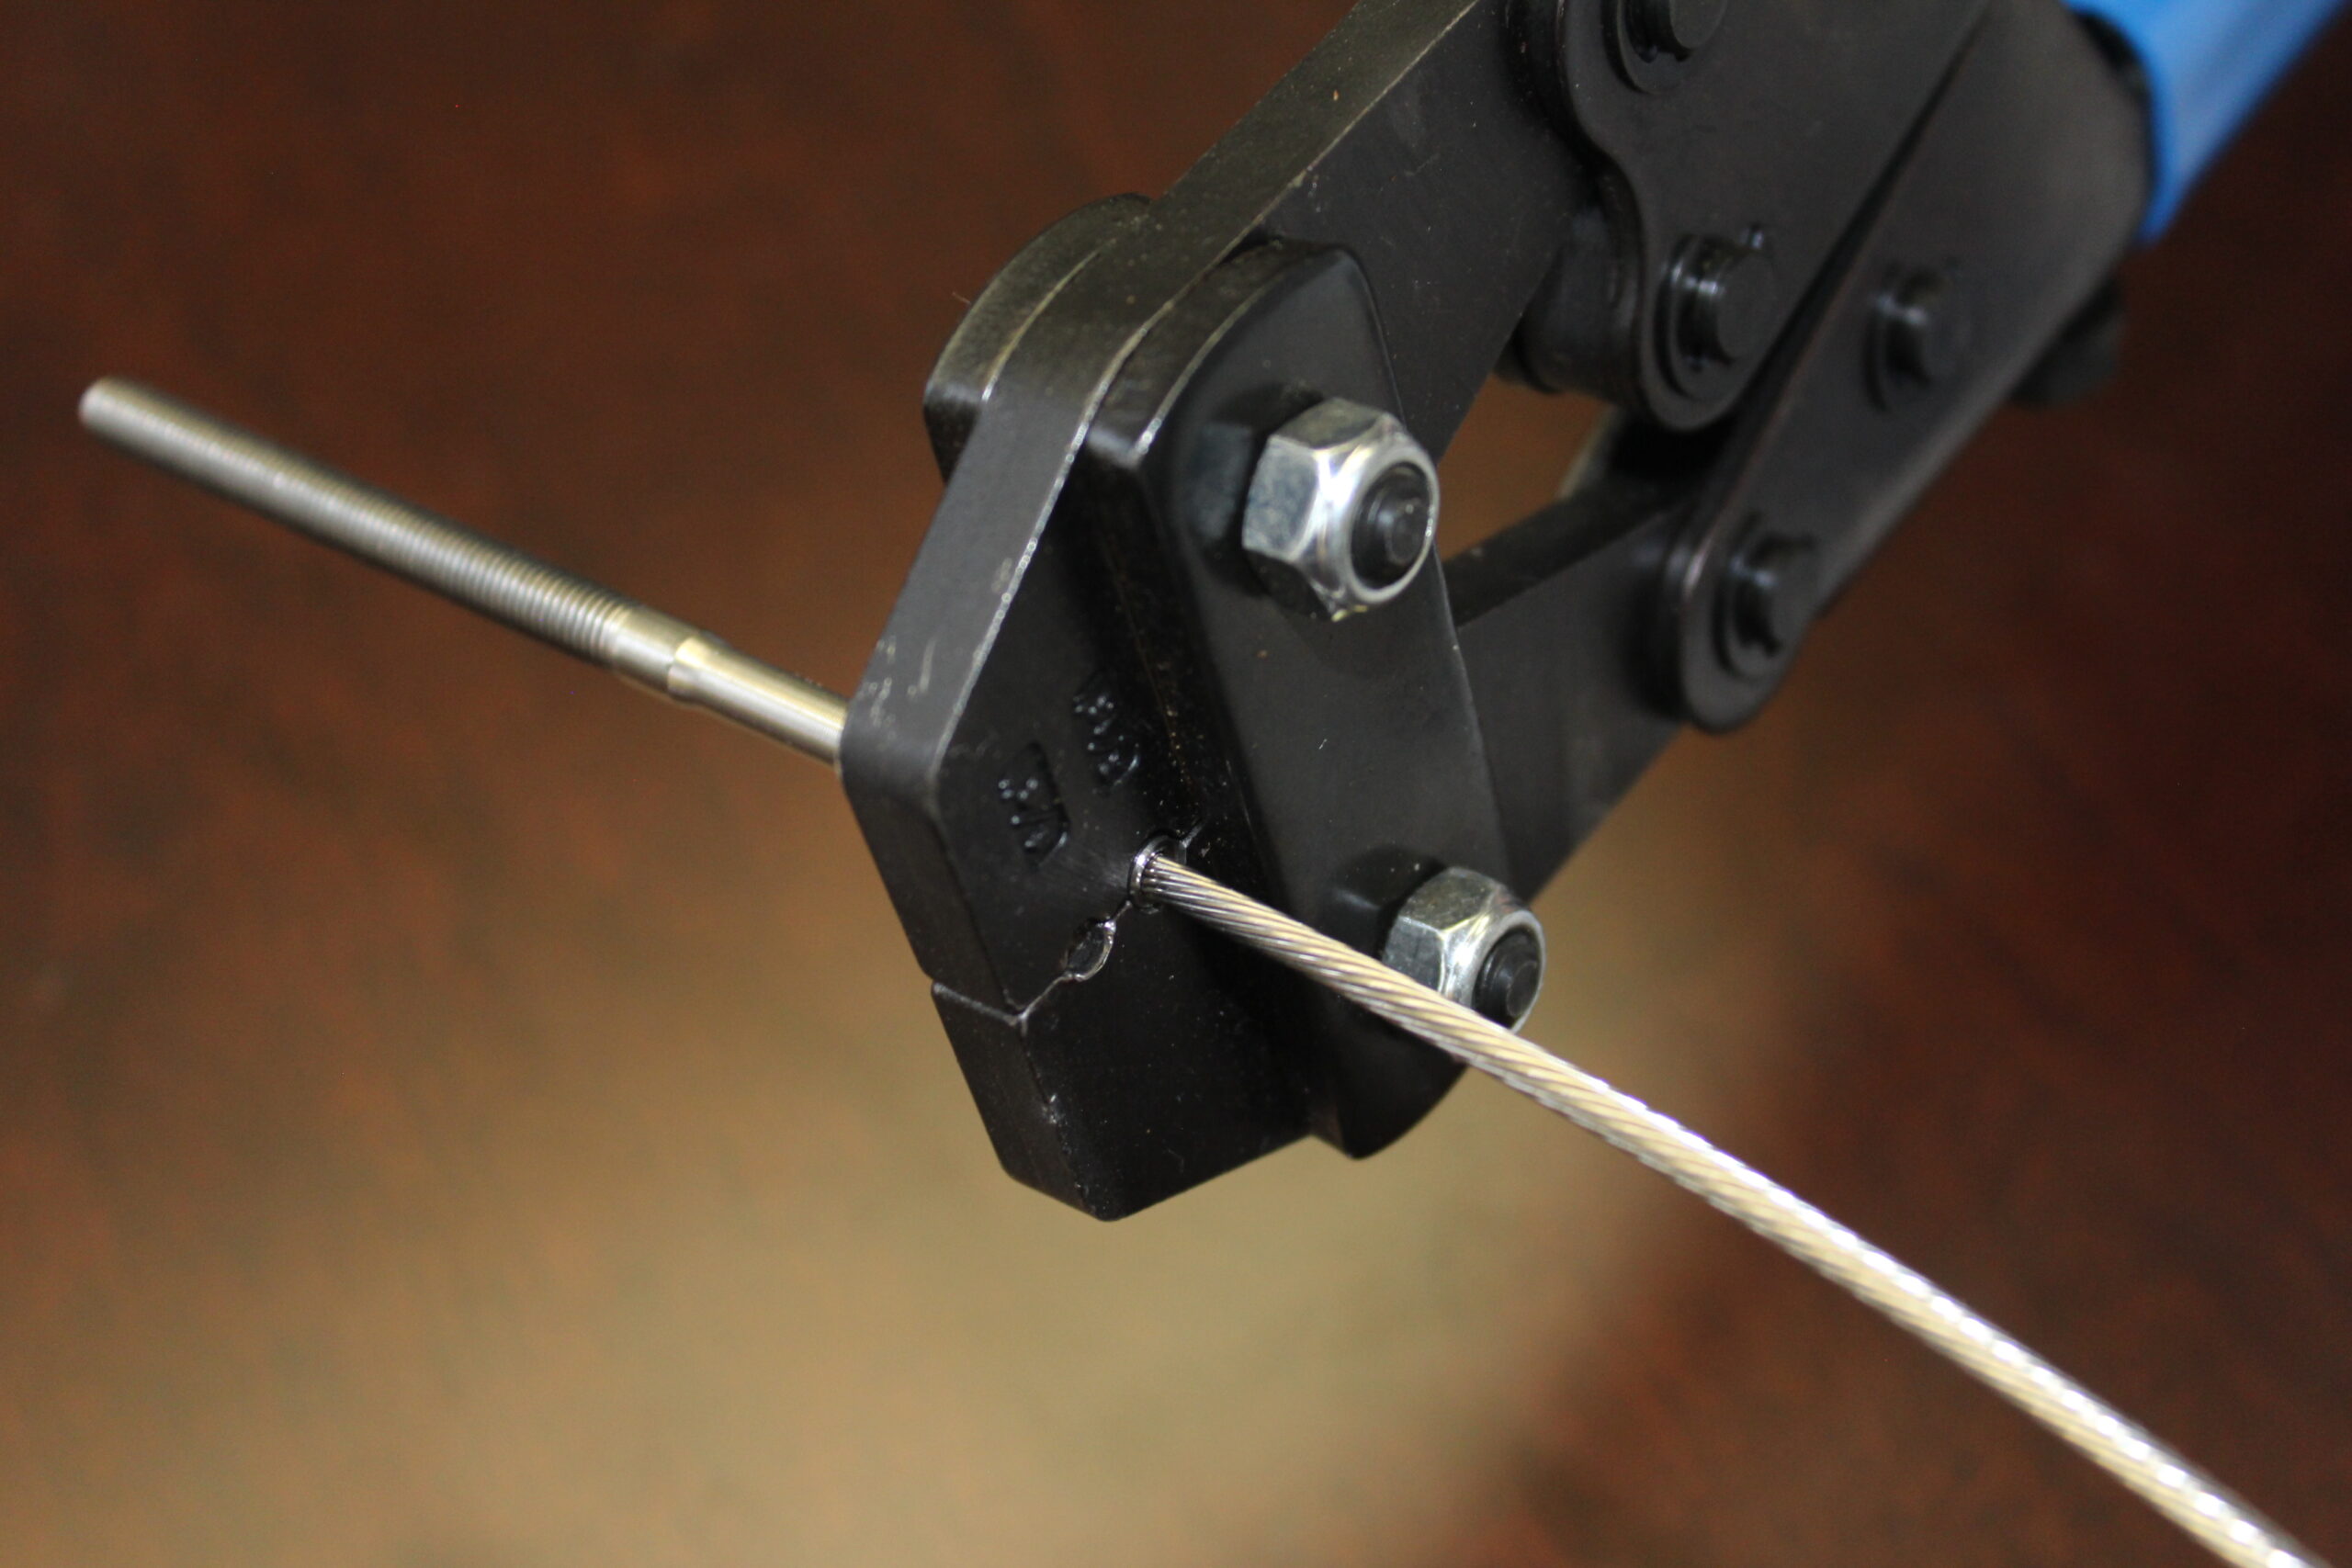
CHOOSING THE RIGHT STAINLESS STEEL FITTINGS FOR YOUR PROJECT When we began installing cable railings in the early 2000’s internet shopping was still rather new and so was the retail cable rail industry. Utilizing marine and aviation rigging was often required in order to put together enough parts and pieces to create a cable railing. Actual cable railing systems were hard to come by and all too often we would see people using large commercial eye bolts and turnbuckles. Finishing cable ends used to require crimp eyes and clasps in order to secure fittings in the field. Much of the hardware at this time was bulky and difficult to handle. The utilitarian aspect of cable railings was not in question but it was a challenge to create a “polished” residential style that could appeal to the masses. Cable railing hardware evolved from the marine rigging and aviation industries but it doesn’t need to follow the same aesthetics. These industries require the absolute most durable hardware; period. It has to be strong enough to withstand huge loads all the while being beaten by salt air and UV. Marine grade stainless steel has performed well for decades and much of the original technology is still used today; however marine rigging needs to be refined for use as railings. Stainless steel fittings used for railings should be attractive and user friendly. “Quick Connect” technology by Feeney showcases these attributes. QUICK CONNECT FITTINGS ARE ATTRACTIVE AND EASY TO INSTALL Quick Connect Fittings allow us to secure cable fittings with no special tools; no crimping or large bulky hardware. New installers or contractors just getting started in to cable railings can achieve professional results with a simple pair of cable cutters. Quick Connect fittings utilize a one way locking mechanism which allows the cable to enter the fitting in one direction and secure itself in the other. The use of a release tool allows the installer to remove the fitting from the cable if necessary. Today’s modern railing systems are more technologically refined and user friendly. A huge selection of fittings are available without the need to special order and our customers have many choices when purchasing stainless steel fittings and hardware. At San Diego Cable Railings we encourage potential customers and new installers to factor the time required as well as the finished product that will result from their hardware choices. High end installations should be sleek and minimize visible hardware. We are no longer bound by old technology or bulky parts. Our aim is to create aesthetics that do not resemble commercial settings unless that is the intent of the designer. Our sales and installation team has performed and assisted thousands of cable railing installations for well over a decade now. Our sales staff can cater a parts list to fit the exact needs of our customers. For customers shopping for a turnkey installation we have preferred installers to assist you all the way through the process. If you have questions about which type of cable hardware is right for your install; give us a call at 844-277-7327 or visit the quote request form today.
Which type of railing post is best for my installation? This month we spoke to our railing pros about the most common scenarios for each type of railing post in order to help our customers make the best choice for their individual projects. Read ahead to see if surface mounted or fascia mounted railing posts are the best option for your project: What are some of the most common scenarios for selecting a fascia mounted railing post? Smaller decks where space is an issue If your deck surface is uneven and you need the ability to adjust the post up or down If you need to use a standoff plate in order to avoid a drip edge flashing If you need to use a 4 bolt pattern and mounting plate due to minimal backing Fascia Mounted Railing Posts Take Up Less Deck Space Fascia mounted railing posts do not take up any space on top of the deck, where as surface mounted posts can eat up about 6″ of space around the perimeter. This is due to the size and location of the mounting plates utilized by surface mounted posts. Fascia mounted posts are typically less expensive; especially when bolted directly through the tube with 2 bolts vs. using a mounting plate with 4 bolts. When should we choose a surface mounted railing post? Concrete decks almost always call for a surface mounted application Wall top railings; interior pony walls; exterior block and CMU walls Level wooden decks with at least 3″ of backing at the post locations Roof decks with gutters or other obstructions that can prevent fascia mounting Surface Mounted Posts Can Be Easier to Install Despite the need for more bolts on a standard install; surface mounted posts can be easier to install on a level deck scenario. On raised decks they provide the ability to install from the top of the deck vs. using a ladder or leaning over the side of the deck. In most cases the installer will be able to use shorter bolts because the mounting plate makes direct contact with the deck surface. Which type of post mount looks better? Aesthetics are really about personal preference when it comes to choosing a post mounting style. Some people like to see the base plate and mounting hardware, while others prefer to see nothing at all. Many times function is much more important when we are talking about a connection that is imperative to the integrity of the railing itself. If you have questions about which type of post mount is best for your installation, give us a call at 844-277-7327 or visit the quote request page.